Understanding nociplastic pain clinical criteria represents a fundamental shift in how healthcare professionals approach chronic pain conditions. The central nervous system’s altered processing of pain signals creates unique diagnostic challenges that require precise clinical assessment.
This comprehensive guide provides healthcare professionals with evidence-based criteria for identifying nociplastic pain. You will gain practical tools for differential diagnosis and patient management strategies.
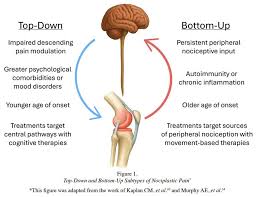
The International Association for the Study of Pain has established clear parameters for nociplastic pain recognition. These criteria help distinguish this pain mechanism from nociceptive and neuropathic pain patterns.
Understanding Nociplastic Pain: Definition and Core Concepts
Nociplastic pain arises from altered nociception despite no clear evidence of actual or threatened tissue damage. This pain mechanism differs fundamentally from traditional pain classifications.
The central nervous system processes pain signals abnormally in nociplastic pain conditions. Patients experience real pain without proportional tissue injury or nerve damage.
The Three-Category Pain Classification System
Modern pain medicine recognizes three distinct mechanistic categories. Each type requires different diagnostic approaches and treatment strategies.
Nociceptive pain results from actual tissue damage or inflammation. This includes common injuries like fractures, burns, or arthritis affecting peripheral tissues.
Neuropathic pain stems from damage or disease affecting the nervous system itself. Conditions like diabetic neuropathy or post-herpetic neuralgia exemplify this category.
Nociplastic pain involves altered pain processing without clear tissue or nerve damage. The central nervous system amplifies and perpetuates pain signals disproportionately.
Nociceptive Pain Features
Direct tissue damage drives this pain type with proportional symptom intensity.
- Clear injury or inflammation present
- Localized pain distribution patterns
- Predictable response to tissue healing
- Standard analgesics often effective
Neuropathic Pain Features
Nerve damage creates distinctive sensory abnormalities and pain characteristics.
- Burning or electric shock sensations
- Follows nerve distribution patterns
- Allodynia and hyperalgesia present
- Responds to neuromodulating medications
Nociplastic Pain Features
Central sensitization drives pain without proportional peripheral pathology.
- Widespread pain distribution typical
- Disproportionate pain to stimulus
- Multiple sensory sensitivities
- Poor response to standard analgesics
Mixed Pain Presentations
Many chronic pain conditions involve multiple overlapping mechanisms simultaneously.
- Combined nociceptive and nociplastic elements
- Evolving pain mechanisms over time
- Requires multimodal assessment approach
- Treatment targets multiple pathways
Historical Context and Evolution of Nociplastic Pain Recognition
The International Association for the Study of Pain formally introduced nociplastic pain terminology in 2017. This classification addressed a significant gap in pain medicine nomenclature.
Previously, clinicians struggled to categorize chronic pain without clear pathology. Terms like “dysfunctional pain” or “central pain” lacked precision and consistency.
Research into central sensitization and altered nociception accelerated recognition of this distinct mechanism. Neuroimaging studies revealed functional brain changes in patients with chronic widespread pain.
Neurobiological Mechanisms Underlying Nociplastic Pain
The central nervous system exhibits heightened responsiveness to sensory stimuli in nociplastic pain. This amplification occurs at spinal and supraspinal levels.
Descending pain modulation pathways function abnormally in affected patients. The balance between facilitatory and inhibitory systems shifts toward increased pain sensitivity.
Neurotransmitter imbalances contribute to altered nociceptive processing. Glutamate levels may increase while GABA inhibition decreases in pain-processing regions.
- Increased excitability of central pain neurons creates lower pain thresholds
- Expanded receptive fields cause pain spreading beyond original injury sites
- Temporal summation amplifies repetitive stimuli disproportionately
- Impaired descending inhibition reduces natural pain suppression mechanisms
- Neuroplastic changes perpetuate pain states beyond tissue healing timelines
Brain imaging reveals altered activity patterns in pain-processing regions. The default mode network and salience network show abnormal connectivity in patients with nociplastic pain.
Inflammatory mediators and immune system changes may contribute to central sensitization. Microglial activation in the central nervous system correlates with chronic pain states.
Download Your Nociplastic Pain Assessment Toolkit
Access our comprehensive clinical toolkit including diagnostic flowcharts, patient assessment questionnaires, and evidence-based decision support tools. This free resource helps streamline nociplastic pain identification in your practice.
Nociplastic Pain Clinical Criteria: Evidence-Based Diagnostic Framework
The International Association for the Study of Pain established specific criteria for nociplastic pain diagnosis. Healthcare professionals must evaluate multiple clinical features systematically.
Diagnosis requires positive clinical features consistent with altered nociception. Simultaneously, clinicians must exclude alternative explanations for the pain experience.
Primary Diagnostic Criteria for Nociplastic Pain
The central criterion involves pain that arises from altered nociception. This pain persists despite no clear evidence of tissue damage or nerve pathology.
Patients with nociplastic pain report symptoms disproportionate to identifiable pathology. Clinical examination findings do not adequately explain the pain distribution or severity.
The pain pattern often includes widespread distribution beyond a single anatomical region. Patients chronic pain frequently involves multiple body areas simultaneously.
- Pain persisting beyond normal tissue healing time without adequate pathological explanation
- Pain distribution that does not conform to dermatomal or peripheral nerve patterns
- Hypersensitivity to multiple sensory stimuli including mechanical, thermal, and chemical
- Comorbid symptoms suggesting central nervous system involvement like fatigue and cognitive difficulties
- Disproportionate pain responses to clinical examination and palpation
Clinical Features Supporting Nociplastic Pain Diagnosis
Several characteristic features strengthen diagnostic confidence when present. These indicators reflect altered nociception in the central nervous system.
Increased sensitivity to normally non-painful stimuli represents a hallmark feature. Patients may experience pain from light touch, clothing pressure, or temperature changes.
Positive Clinical Indicators
- Widespread pain distribution across multiple body regions and anatomical areas
- Mechanical allodynia with pain from light pressure or touch
- Temporal summation showing increased pain with repetitive stimulation
- Heightened response to normally mild painful stimuli
- Pain persisting months to years beyond expected healing
- Multiple areas of tenderness on physical examination
- Sleep disturbance and unrefreshing rest patterns
- Cognitive difficulties including concentration and memory problems
- Fatigue disproportionate to activity levels
- Mood disturbances including anxiety and depression
Exclusionary Considerations
Clinicians must rule out other pain mechanisms before confirming nociplastic pain diagnosis.
- Adequate imaging excludes structural pathology
- Laboratory tests rule out inflammatory conditions
- Neurological examination excludes neuropathic causes
- Pain distribution differs from typical neuropathic patterns
- No recent tissue injury or ongoing inflammation
The presence of some tissue damage does not automatically exclude nociplastic pain. Mixed pain mechanisms commonly coexist in chronic pain conditions.
Quantitative Sensory Testing in Nociplastic Pain Assessment
Quantitative sensory testing provides objective measures of altered pain processing. These standardized protocols assess various sensory modalities systematically.
Pressure pain thresholds typically show reduced values in patients with nociplastic pain. Testing multiple body sites reveals widespread hypersensitivity patterns.
Temporal summation testing demonstrates enhanced wind-up responses. Repetitive stimuli produce progressively increasing pain ratings in affected individuals.
| Assessment Method |
Measured Parameter |
Nociplastic Pattern |
Clinical Interpretation |
| Pressure Pain Threshold |
Minimum pressure causing pain |
Reduced thresholds at multiple sites |
Indicates widespread mechanical hypersensitivity |
| Temporal Summation |
Pain increase with repetition |
Enhanced wind-up response |
Suggests central amplification mechanisms |
| Conditioned Pain Modulation |
Pain inhibition by secondary stimulus |
Reduced or absent inhibition |
Impaired descending pain control systems |
| Cold Pain Threshold |
Temperature causing pain sensation |
Elevated threshold temperatures |
Altered thermal pain processing |
| Heat Pain Threshold |
Temperature triggering pain response |
Decreased threshold temperatures |
Thermal hypersensitivity present |
Widespread Pain Distribution Patterns
Pain distribution in nociplastic conditions typically extends beyond localized regions. Patients chronic pain often describe symptoms affecting multiple quadrants of the body.
The widespread pain distribution differs from dermatomal or peripheral nerve patterns. This characteristic helps distinguish nociplastic pain from neuropathic pain conditions.
Chronic widespread pain requires pain in at least four of five body regions. The axial skeleton must be involved along with upper and lower body segments.
Fibromyalgia represents the prototypical nociplastic pain condition with widespread distribution. Research demonstrates that patients nociplastic pain frequently meet fibromyalgia criteria.
Comorbid Symptoms and Associated Features
Nociplastic pain conditions frequently present with multiple non-pain symptoms. These associated features reflect widespread central nervous system involvement.
Sleep disturbance affects the majority of patients with nociplastic pain conditions. Unrefreshing sleep perpetuates pain sensitivity and reduces pain thresholds.
Cognitive difficulties commonly accompany chronic pain states. Patients report problems with concentration, memory, and mental clarity.
- Fatigue persisting despite rest and affecting daily function
- Sleep disorders including insomnia and non-restorative sleep patterns
- Cognitive dysfunction affecting attention, memory, and processing speed
- Mood disturbances with increased anxiety and depression prevalence
- Irritable bowel syndrome symptoms in substantial patient subsets
- Headaches and migraine occurring more frequently than general population
- Temporomandibular joint dysfunction and facial pain
- Hypersensitivity to environmental stimuli including sounds, lights, and chemicals
The presence of multiple comorbid symptoms strengthens nociplastic pain diagnosis. These features suggest widespread alterations in central nervous system processing.
Common Clinical Conditions Involving Nociplastic Pain Mechanisms
Numerous chronic pain conditions demonstrate nociplastic pain mechanisms as primary drivers. Recognition of these conditions helps clinicians apply appropriate diagnostic criteria.
Some conditions exhibit pure nociplastic mechanisms while others involve mixed pain types. Understanding this spectrum improves treatment selection and patient outcomes.
Fibromyalgia: The Prototypical Nociplastic Pain Condition
Fibromyalgia exemplifies nociplastic pain with widespread distribution and central sensitization. This condition affects approximately 2-4% of the general population.
Patients chronic pain in fibromyalgia demonstrate heightened sensitivity to multiple sensory stimuli. Research consistently shows altered central pain processing in affected individuals.
The American College of Rheumatology criteria for fibromyalgia emphasize widespread pain and symptom severity. Tender point examination has become less central to diagnosis.
- Widespread pain affecting multiple body regions for at least three months
- Absence of other disorders that adequately explain the pain symptoms
- Widespread pain index score above threshold values indicating pain extent
- Symptom severity scale capturing fatigue, cognitive symptoms, and somatic complaints
- Sleep disturbance affecting most patients with significant impact on function
- Cognitive difficulties termed “fibro fog” by patients describing the experience
Treatment for fibromyalgia targets central pain mechanisms rather than peripheral pathology. Medications affecting neurotransmitter systems show greater efficacy than traditional analgesics.
Chronic Widespread Pain Beyond Fibromyalgia
Chronic widespread pain represents a broader category than fibromyalgia alone. Many patients exhibit nociplastic mechanisms without meeting all fibromyalgia criteria.
The definition requires pain in multiple body quadrants lasting over three months. This pattern suggests central sensitization even when other fibromyalgia features are absent.
Population studies indicate that chronic widespread pain affects 10-15% of adults. Only a subset of these individuals meet full fibromyalgia diagnostic criteria.
Chronic Low Back Pain with Nociplastic Features
Non-specific chronic low back pain frequently involves nociplastic pain mechanisms. Patients show pain persistence despite minimal structural pathology on imaging.
Increased sensitivity to pressure over the lumbar spine indicates altered nociceptive processing. Pain distribution often extends beyond the lower back to affect legs and other regions.
Indicators of Nociplastic Mechanisms in Back Pain
- Pain severity disproportionate to imaging findings
- Widespread tenderness beyond lumbar region
- Poor response to targeted interventions
- Multiple failed treatment attempts
- Significant functional impairment
- High pain catastrophizing scores
- Comorbid sleep and mood problems
Distinguishing Features from Nociceptive Back Pain
- Absence of inflammatory markers
- Normal or minimal imaging changes
- Pain not relieved by position changes
- Hypervigilance to body sensations
- Multiple sensory sensitivities present
- Chronic pain duration exceeding expectations
- Failed surgical outcomes historically
Irritable Bowel Syndrome and Visceral Hypersensitivity
Irritable bowel syndrome demonstrates nociplastic mechanisms affecting visceral pain processing. Patients experience abdominal pain without structural gastrointestinal pathology.
Visceral hypersensitivity represents a key feature of irritable bowel syndrome. The central nervous system amplifies normal gut sensations into painful experiences.
Overlap between irritable bowel syndrome and other nociplastic conditions occurs frequently. Studies show elevated rates of fibromyalgia, chronic headaches, and other pain conditions.
Temporomandibular Disorders with Central Sensitization
Temporomandibular disorders often involve nociplastic pain mechanisms beyond local joint pathology. Patients chronic pain demonstrate widespread sensitivity and comorbid symptoms.
Myofascial pain affecting jaw muscles shows characteristics of altered nociception. Trigger points produce referred pain patterns extending beyond local tissues.
Research indicates that many temporomandibular disorder patients have widespread pain sensitivity. Pressure pain thresholds decrease at distant body sites unrelated to jaw structures.
Complex Regional Pain Syndrome
Complex regional pain syndrome exhibits mixed pain mechanisms including nociplastic features. Initial nociceptive or neuropathic pain evolves to involve central sensitization.
Patients experience pain severity and distribution exceeding expected injury patterns. The condition demonstrates clear central nervous system involvement in pain maintenance.
Neuroplastic changes in sensorimotor cortex representation occur in chronic cases. Brain imaging reveals altered processing of sensory input from affected limbs.
Chronic Headache Syndromes
Chronic migraine and chronic tension-type headaches involve nociplastic pain mechanisms. Central sensitization contributes to headache chronification and medication overuse patterns.
Patients with chronic headaches show increased sensitivity beyond the head region. Widespread pain sensitivity suggests central nervous system alterations perpetuating headaches.
- Medication overuse headache develops through central sensitization mechanisms
- Cutaneous allodynia during migraine attacks indicates central amplification
- Comorbidity with fibromyalgia occurs more frequently than expected by chance
- Chronic daily headache patients demonstrate altered pain processing on testing
Primary Fibromyalgia Syndrome
Widespread musculoskeletal pain with tenderness, fatigue, sleep disturbance, and cognitive difficulties representing the classic nociplastic condition.
- Affects 2-4% of population
- Female predominance 7:1 ratio
- Multiple comorbid symptoms
Irritable Bowel Syndrome
Chronic abdominal pain with altered bowel habits, visceral hypersensitivity, and gut-brain axis dysfunction without structural pathology.
- Prevalence 10-15% worldwide
- Visceral hyperalgesia present
- Overlaps with other conditions
Chronic Tension Headaches
Persistent bilateral head pain with pressure quality, often involving central sensitization and widespread sensitivity beyond cranial regions.
- Most common headache type
- Central sensitization mechanisms
- Responds to central treatments
Access Comprehensive Pain Management Resources
Unlock our complete resource library featuring treatment algorithms, patient education handouts, and evidence-based research summaries. Register your professional email to receive instant access to tools that enhance your clinical practice.
Assessment Methods for Identifying Nociplastic Pain in Clinical Practice
Systematic assessment using validated tools improves nociplastic pain identification accuracy. Healthcare professionals benefit from structured approaches combining history, examination, and questionnaires.
No single test definitively diagnoses nociplastic pain. Clinicians must integrate multiple assessment modalities to build diagnostic confidence.
Comprehensive Pain History Taking
Detailed pain history provides critical diagnostic information for nociplastic pain assessment. Specific questioning reveals characteristics suggesting altered central pain processing.
The temporal pattern of pain development offers important clues. Gradual spreading from localized to widespread distribution suggests progressive central sensitization.
Responses to previous treatments indicate likely pain mechanisms. Poor response to peripherally-targeted therapies suggests central nervous system involvement.
- Document pain location using body diagrams to identify widespread distribution patterns
- Assess pain quality descriptors including burning, aching, and pressure sensations
- Evaluate temporal patterns noting constant versus intermittent pain experiences
- Identify aggravating and relieving factors to understand pain triggers
- Review treatment history including responses to medications and interventions
- Assess functional impact on daily activities, work, and social participation
- Screen for comorbid symptoms including sleep, fatigue, and cognitive difficulties
- Evaluate psychosocial factors influencing pain experience and coping strategies
Physical Examination Findings
Physical examination in nociplastic pain reveals characteristic patterns of hypersensitivity. Standardized examination techniques identify widespread tenderness and altered pain thresholds.
Palpation pressure should be standardized using approximately 4 kg/cm² of force. This pressure creates blanching of the examiner’s thumbnail when applied.
Multiple tender points distributed across the body suggest nociplastic mechanisms. Testing should include both typical fibromyalgia tender point locations and control sites.
| Examination Component |
Assessment Technique |
Nociplastic Finding |
Clinical Significance |
| Widespread Palpation |
4 kg/cm² pressure at multiple sites |
Tenderness at 11+ of 18 points |
Indicates generalized hyperalgesia |
| Allodynia Testing |
Light brush stroke on skin |
Pain from normally non-painful touch |
Demonstrates mechanical sensitization |
| Temporal Summation |
Repetitive pinprick or pressure |
Progressive pain increase with repetition |
Reveals central wind-up phenomenon |
| Pain Distribution |
Body diagram completion by patient |
Multiple regions affected bilaterally |
Suggests widespread central changes |
| Joint Examination |
Range of motion and joint palpation |
Pain without swelling or deformity |
Excludes inflammatory arthropathy |
| Neurological Testing |
Sensory, motor, reflex evaluation |
Normal findings without deficits |
Rules out neuropathic mechanisms |
Validated Screening Questionnaires
Several validated questionnaires help identify nociplastic pain in clinical settings. These tools provide standardized assessment improving diagnostic consistency.
The Fibromyalgia Survey Questionnaire assesses widespread pain and symptom severity. This self-report instrument shows strong correlation with clinical diagnosis.
The Central Sensitization Inventory screens for symptoms associated with central sensitization. Scores above established cutoffs suggest nociplastic pain mechanisms.
Fibromyalgia Survey Questionnaire
- Widespread Pain Index (0-19 scale)
- Symptom Severity Scale (0-12 scale)
- Assesses 19 body regions for pain
- Evaluates fatigue, sleep, cognitive symptoms
- Self-administered patient completion
- Strong diagnostic accuracy demonstrated
Central Sensitization Inventory
- 25-item symptom questionnaire
- Scores range from 0-100 points
- Cutoff score 40 suggests sensitization
- Assesses multiple symptom domains
- Validated across multiple conditions
- Useful screening tool in practice
Pain Sensitivity Questionnaire
- Assesses self-reported pain sensitivity
- 17 items covering pain scenarios
- Correlates with experimental testing
- Predicts treatment responses
- Quick administration time
- Available in multiple languages
Laboratory and Imaging Studies
Laboratory testing in nociplastic pain primarily serves to exclude other conditions. No biomarkers specifically diagnose altered central pain processing currently.
Basic laboratory panels rule out inflammatory, endocrine, and metabolic disorders. Complete blood count, inflammatory markers, and thyroid function provide useful information.
Imaging studies typically appear normal or show findings inadequate to explain symptoms. The absence of proportional pathology supports nociplastic pain diagnosis.
- Complete blood count excludes anemia and infection contributing to symptoms
- Erythrocyte sedimentation rate and C-reactive protein rule out inflammatory conditions
- Thyroid function tests identify hypothyroidism mimicking fibromyalgia symptoms
- Vitamin D levels assess common deficiency affecting pain sensitivity
- Rheumatoid factor and anti-CCP antibodies exclude rheumatoid arthritis
- Creatine kinase evaluates for muscle disorders causing pain and weakness
Advanced imaging like functional MRI shows promise for research but lacks clinical utility. These techniques reveal altered brain activity patterns in patients nociplastic pain.
Quantitative Sensory Testing Protocols
Quantitative sensory testing provides objective measures of sensory function and pain processing. Standardized protocols assess thermal, mechanical, and electrical pain thresholds.
Pressure pain threshold testing uses a handheld algometer applying gradually increasing pressure. Patients indicate when pressure transitions from sensation to pain.
Testing multiple body sites reveals widespread hypersensitivity patterns. Both painful areas and distant control sites show reduced thresholds in nociplastic pain.
Temporal summation protocols apply repeated stimuli at constant intensity. Progressive pain increases despite unchanging stimulus intensity indicate central amplification.
Differential Diagnosis Considerations
Distinguishing nociplastic pain from other conditions requires systematic evaluation. Several disorders may mimic or coexist with altered central pain processing.
Inflammatory conditions like rheumatoid arthritis cause widespread pain but show joint swelling and laboratory abnormalities. Physical examination reveals synovitis distinguishing inflammatory arthropathy.
Hypothyroidism produces fatigue, pain, and cognitive symptoms resembling fibromyalgia. Thyroid function testing identifies this treatable metabolic disorder.
Conditions to Differentiate
- Rheumatoid arthritis with inflammatory joint changes and positive serology
- Polymyalgia rheumatica causing proximal muscle pain in older adults
- Hypothyroidism producing pain, fatigue, and cognitive slowing
- Vitamin D deficiency contributing to musculoskeletal pain
- Sleep apnea causing unrefreshing sleep and daytime fatigue
- Depression with somatic symptoms and pain amplification
- Medication side effects including statin-induced myalgia
- Peripheral neuropathy with nerve damage causing pain
Key Distinguishing Features
Specific clinical and laboratory findings help differentiate nociplastic pain from mimicking conditions.
- Normal inflammatory markers rule out active inflammation
- Absence of joint swelling excludes inflammatory arthritis
- Normal neurological examination makes neuropathy unlikely
- Widespread pain distribution differs from dermatomal patterns
- Multiple symptom domains suggest central mechanisms
Remember that conditions may coexist. Patients with rheumatoid arthritis can develop secondary nociplastic pain mechanisms.
Clinical Decision Support Tools
Decision support algorithms help clinicians systematically evaluate pain mechanisms. These structured approaches improve diagnostic accuracy and treatment selection.
The American Pain Society developed guidelines for nociplastic pain recognition. These evidence-based recommendations provide practical assessment frameworks for health care professionals.
Electronic medical record integration of screening tools facilitates routine assessment. Automated scoring and clinical decision support enhance identification of patients nociplastic pain.
Evidence-Based Treatment Approaches for Nociplastic Pain Management
Treatment for nociplastic pain conditions requires a multimodal approach targeting central mechanisms. Therapies aim to reduce central sensitization and restore normal pain processing.
Effective management combines pharmacological, non-pharmacological, and self-management strategies. Patient education about pain mechanisms forms the foundation of treatment.
Pharmacological Treatment Strategies
Medications targeting central nervous system neurotransmitters show greater efficacy than traditional analgesics. Drugs modulating serotonin, norepinephrine, and GABA demonstrate benefit in clinical trials.
Tricyclic antidepressants like amitriptyline reduce pain severity and improve sleep quality. These medications enhance descending pain inhibition pathways in the central nervous system.
Serotonin-norepinephrine reuptake inhibitors including duloxetine and milnacipran show FDA approval for fibromyalgia. These agents modulate central pain pathways effectively.
Gabapentinoids like pregabalin reduce hyperexcitability in central pain neurons. Clinical trials demonstrate efficacy for fibromyalgia and other nociplastic pain conditions.
| Medication Class |
Examples |
Mechanism of Action |
Evidence Level |
| Tricyclic Antidepressants |
Amitriptyline, Nortriptyline |
Enhance descending inhibition, improve sleep |
Strong evidence in multiple conditions |
| SNRIs |
Duloxetine, Milnacipran |
Increase serotonin and norepinephrine |
FDA approved for fibromyalgia |
| Gabapentinoids |
Pregabalin, Gabapentin |
Reduce neuronal hyperexcitability |
Strong efficacy in clinical trials |
| Muscle Relaxants |
Cyclobenzaprine, Tizanidine |
Central muscle relaxation, improve sleep |
Moderate evidence for symptom relief |
| NSAIDs |
Ibuprofen, Naproxen |
Peripheral anti-inflammatory effects |
Limited efficacy as monotherapy |
| Opioids |
Various formulations |
Mu receptor agonism |
Not recommended, poor risk-benefit |
Traditional non-steroidal anti-inflammatory drugs show limited benefit for pure nociplastic pain. These peripherally-acting agents do not address central sensitization mechanisms.
Opioid analgesics are not recommended for nociplastic pain management. Evidence shows poor efficacy and significant risks including hyperalgesia and dependence.
Non-Pharmacological Treatment Modalities
Non-pharmacological interventions play essential roles in comprehensive nociplastic pain treatment. These approaches often provide benefits equal to or exceeding medications.
Aerobic exercise programs demonstrate strong evidence for reducing pain severity and improving function. Gradual progression prevents exercise-induced pain flares in sensitive patients.
Low-impact activities like walking, swimming, or cycling work well for most patients. Exercise duration and intensity should increase gradually over weeks to months.
- Aerobic exercise for 30 minutes most days improves pain and function significantly
- Strength training builds muscle endurance and reduces pain-related disability
- Flexibility exercises maintain range of motion and reduce muscle tension
- Mind-body practices including yoga and tai chi show moderate efficacy
- Cognitive behavioral therapy addresses pain catastrophizing and maladaptive thoughts
- Mindfulness-based stress reduction improves pain acceptance and quality of life
- Sleep hygiene interventions target the sleep disturbance perpetuating pain sensitivity
- Pacing strategies help patients balance activity and rest appropriately
Cognitive Behavioral Therapy and Psychological Interventions
Cognitive behavioral therapy for chronic pain targets thoughts, emotions, and behaviors affecting pain experience. This structured approach teaches coping skills and reduces pain-related distress.
Pain catastrophizing represents a key target for psychological intervention. Patients learn to identify and modify exaggerated negative thoughts about pain.
Acceptance and commitment therapy helps patients develop psychological flexibility. This approach emphasizes valued living despite persistent pain rather than pain elimination.
Group therapy programs provide peer support and shared learning experiences. Multidisciplinary pain rehabilitation programs integrate multiple treatment modalities.
Patient Education and Self-Management
Patient education about pain mechanisms improves outcomes in nociplastic pain conditions. Understanding the neurobiology of central sensitization reduces fear and catastrophizing.
Explaining that pain does not equal tissue damage helps patients engage in therapeutic activities. This knowledge reduces kinesiophobia and avoidance behaviors.
Self-management programs teach patients skills for managing symptoms independently. These programs emphasize active patient participation rather than passive treatment.
Key Education Topics
- Pain neurobiology and central sensitization concepts
- Difference between hurt and harm
- Importance of gradual activity increase
- Sleep hygiene and restoration strategies
- Stress management techniques
- Pacing principles for activity management
- Medication expectations and proper use
- When to seek additional medical care
Self-Management Strategies
- Daily activity scheduling and pacing
- Home exercise program adherence
- Sleep routine optimization
- Stress reduction practice
- Symptom tracking and pattern recognition
- Relapse prevention planning
- Social support cultivation
- Healthy lifestyle maintenance
Physical Therapy and Manual Therapy Approaches
Physical therapy interventions address multiple aspects of nociplastic pain management. Therapists guide exercise progression and teach movement strategies.
Manual therapy techniques may provide temporary symptom relief. However, passive treatments should not replace active patient participation in rehabilitation.
Graded motor imagery and mirror therapy show promise for conditions like complex regional pain syndrome. These approaches target cortical reorganization contributing to pain states.
Complementary and Integrative Therapies
Acupuncture demonstrates moderate evidence for chronic pain conditions including fibromyalgia. Traditional Chinese acupuncture and electroacupuncture both show benefits in studies.
Massage therapy provides short-term pain relief and relaxation. Regular sessions may improve sleep quality and reduce stress in patients chronic pain.
Dietary interventions including anti-inflammatory diets show interest but limited strong evidence. Some patients report symptom improvements with elimination of specific foods.
Acupuncture Treatment
Traditional needling techniques target pain reduction through multiple proposed mechanisms including endorphin release and gate control activation.
- Moderate quality evidence for benefit
- 6-12 sessions typically recommended
- May reduce medication requirements
- Low risk when performed properly
Massage Therapy
Manual soft tissue manipulation provides relaxation, temporary pain relief, and may improve sleep quality in chronic pain patients.
- Short-term symptom improvement
- Regular sessions may help
- Addresses muscle tension
- Generally safe and well-tolerated
Mindfulness Meditation
Structured meditation practices cultivate non-judgmental awareness of present-moment experience including pain sensations and thoughts.
- Reduces pain catastrophizing
- Improves quality of life measures
- 8-week programs commonly used
- Complements other treatments
Multidisciplinary Pain Management Programs
Comprehensive interdisciplinary pain rehabilitation programs provide intensive multimodal treatment. These programs integrate medical, psychological, and rehabilitation services.
Team members typically include physicians, psychologists, physical therapists, and occupational therapists. Coordinated treatment addresses the multidimensional nature of chronic pain.
Programs emphasize function restoration and return to meaningful activities. Pain reduction becomes a secondary goal compared to improving quality of life.
Research demonstrates that intensive interdisciplinary programs produce lasting improvements. Patients show reduced disability, healthcare utilization, and medication use long-term.
Download Patient Education Materials
Enhance patient communication with our professionally designed education handouts. These evidence-based materials explain nociplastic pain concepts in accessible language, helping patients understand their diagnosis and engage in treatment. Available in multiple formats for clinical use.
Emerging Research and Future Directions in Nociplastic Pain
Scientific understanding of nociplastic pain continues evolving rapidly. New research reveals additional mechanisms and potential therapeutic targets for altered nociception.
Advanced neuroimaging techniques provide unprecedented insights into brain changes associated with chronic pain. These technologies may eventually enable objective biomarkers for diagnosis.
Neuroimaging Advances in Pain Research
Functional magnetic resonance imaging reveals altered brain activity patterns in patients nociplastic pain. Studies show differences in pain-processing regions compared to healthy controls.
The default mode network demonstrates altered connectivity in fibromyalgia and chronic widespread pain. These changes correlate with pain severity and symptom duration.
Positron emission tomography studies identify neurotransmitter system abnormalities. Opioid receptor availability differs in patients chronic pain versus pain-free individuals.
Magnetic resonance spectroscopy measures brain metabolite concentrations. Glutamate and GABA levels show alterations in pain-processing regions of affected patients.
Genetic and Molecular Research
Genetic studies investigate hereditary factors contributing to nociplastic pain susceptibility. Twin studies suggest moderate genetic influence on fibromyalgia and chronic widespread pain risk.
Candidate gene association studies examine specific genetic variants. Polymorphisms affecting serotonin, catecholamine, and opioid systems show associations with pain sensitivity.
Epigenetic modifications may explain how environmental factors influence pain susceptibility. DNA methylation changes affect gene expression in chronic pain states.
- Genome-wide association studies identify multiple genetic loci associated with chronic pain
- Gene variants affecting neurotransmitter systems influence pain sensitivity and treatment responses
- Inflammatory gene polymorphisms contribute to central sensitization development
- Epigenetic changes from stress and trauma may perpetuate pain states
- Personalized medicine approaches may use genetic information to guide treatment selection
Novel Pharmacological Targets
Research investigates new medication classes targeting specific mechanisms of central sensitization. These agents may provide alternatives to current pharmacological options.
Cannabinoid system modulation shows promise in preclinical and early clinical studies. Both cannabis-based medications and synthetic cannabinoids undergo investigation.
Glial cell inhibitors target neuroinflammation contributing to central sensitization. Microglial activation in the central nervous system represents a potential therapeutic target.
Low-dose naltrexone may modulate immune function and reduce central nervous system inflammation. Small studies suggest potential benefits for fibromyalgia and other conditions.
Neuromodulation Techniques
Non-invasive brain stimulation methods offer potential alternatives to medications. Transcranial magnetic stimulation and transcranial direct current stimulation undergo active research.
Repetitive transcranial magnetic stimulation targets motor cortex regions affecting pain processing. Some studies show pain reduction lasting beyond treatment sessions.
Spinal cord stimulation for refractory cases shows mixed results for nociplastic pain. Patient selection and programming optimization influence outcomes significantly.
Precision Medicine and Personalized Treatment
Future approaches may use biomarkers to match patients with optimal treatments. Genetic, imaging, and sensory testing data could guide individualized therapy selection.
Quantitative sensory testing profiles may predict medication responses. Patients with specific pain sensitivity patterns might benefit from targeted drug choices.
Machine learning algorithms analyze multiple data sources to predict treatment outcomes. These computational approaches may improve clinical decision-making efficiency.
Current Research Priorities
- Objective diagnostic biomarkers for nociplastic pain identification
- Brain imaging patterns predicting treatment responses
- Genetic markers guiding medication selection
- Novel drug targets for central sensitization
- Optimized neuromodulation protocols
- Prevention strategies for high-risk individuals
- Mechanisms of pain chronification
- Integration of multiple assessment modalities
Future Clinical Applications
Anticipated advances will transform nociplastic pain diagnosis and treatment in coming years.
- Blood tests identifying pain biomarkers
- Imaging-guided treatment selection
- Genetically-informed medication choices
- Personalized pain rehabilitation programs
- Early intervention preventing chronification
- Digital therapeutics and mobile health tools
These developments promise more precise, effective management for patients nociplastic pain conditions.
Digital Health and Telemedicine Innovations
Mobile health applications facilitate symptom tracking and self-management support. These technologies enable continuous monitoring between clinical visits.
Telemedicine expands access to specialized pain management services. Virtual consultations help patients in underserved areas receive expert guidance.
Virtual reality therapies show promise for pain distraction and rehabilitation. Immersive environments may enhance engagement with therapeutic activities.
Artificial intelligence chatbots provide patient education and support. These tools offer 24/7 access to information and coping strategy reminders.
Implementing Nociplastic Pain Assessment in Clinical Practice
Healthcare professionals face practical challenges integrating nociplastic pain assessment into busy clinical workflows. Efficient screening and diagnostic approaches maximize limited appointment time.
Systematic implementation improves identification rates while maintaining productivity. Strategic use of validated tools streamlines the evaluation process.
Workflow Integration Strategies
Brief screening questionnaires completed before appointments identify patients potentially having nociplastic pain. Medical assistants or nurses can administer these tools during intake.
The Fibromyalgia Survey Questionnaire takes 5-10 minutes for patient completion. This instrument provides diagnostic information without extending visit time significantly.
Electronic medical record integration automates scoring and flags high-risk patients. Clinical decision support alerts prompt appropriate evaluation and documentation.
Template notes with structured assessment elements ensure comprehensive evaluation. These templates guide history-taking and physical examination components.
- Implement pre-visit screening questionnaires to identify potential nociplastic pain patients
- Use electronic medical record templates with structured assessment components
- Train support staff to administer and score validated screening instruments
- Develop standardized physical examination protocols for efficient tender point testing
- Create patient education handouts explaining nociplastic pain concepts clearly
- Establish referral pathways to physical therapy, psychology, and pain specialists
- Document diagnostic reasoning and treatment plans using consistent terminology
- Schedule appropriate follow-up intervals to monitor treatment responses
Documentation Best Practices
Clear documentation communicates diagnostic reasoning to other providers and payers. Specific terminology helps justify treatment selections and prior authorization requests.
Document the presence of nociplastic pain criteria explicitly in assessment sections. List positive clinical features supporting the diagnosis systematically.
Describe differential diagnosis considerations and exclusion of alternative explanations. This documentation demonstrates thorough evaluation and clinical judgment.
- Use ICD-10 codes appropriate for the primary nociplastic pain condition diagnosed
- Document widespread pain index and symptom severity scale scores when applicable
- List specific positive examination findings including tender point counts
- Record results of screening questionnaires and sensory testing
- Describe failed previous treatments suggesting central mechanisms
- Note comorbid symptoms supporting nociplastic pain diagnosis
- Document patient education provided about pain mechanisms
- Create comprehensive treatment plans addressing multiple domains
Interdisciplinary Collaboration
Effective nociplastic pain management requires coordination across multiple healthcare disciplines. Primary care physicians, pain specialists, and mental health providers all contribute to comprehensive care.
Physical therapists provide exercise prescription and manual therapy interventions. Clear communication about pain mechanisms guides appropriate treatment approaches.
Clinical psychologists or behavioral health specialists address cognitive and emotional factors. Integrated behavioral health models facilitate access to these services.
Primary Care Role
- Initial screening and diagnosis
- Basic medication management
- Coordination of specialist referrals
- Patient education delivery
- Monitoring treatment responses
- Managing comorbid conditions
- Long-term follow-up care
Pain Specialist Role
- Complex case evaluation
- Advanced medication trials
- Interventional procedures when appropriate
- Diagnostic confirmation
- Treatment optimization strategies
- Consultation for primary providers
- Multidisciplinary program oversight
Mental Health Role
- Cognitive behavioral therapy
- Address pain catastrophizing
- Treat comorbid mood disorders
- Teach coping strategies
- Provide stress management
- Support behavior change
- Enhance treatment adherence
Patient Communication Strategies
Explaining nociplastic pain to patients requires clear, accessible language. Avoid overly technical terminology while maintaining accuracy.
Emphasize that pain is real even without visible tissue damage. This validation reduces patient distress and improves therapeutic relationships.
Use analogies to explain central sensitization concepts. Comparing the nervous system to an over-sensitive alarm system helps patients understand mechanisms.
“Think of your nervous system like a volume control that’s stuck on high. It’s amplifying normal signals from your body into pain messages. The pain is real, but it doesn’t mean your tissues are damaged. Our treatment aims to turn down that volume gradually.”
Example patient explanation of nociplastic pain
Discuss realistic treatment expectations emphasizing function improvement over complete pain elimination. This approach reduces disappointment and enhances satisfaction.
Provide written materials reinforcing verbal education. Patients benefit from reviewing information at home and sharing with family members.
Monitoring Treatment Outcomes
Standardized outcome measures track treatment effectiveness objectively. Regular assessment guides therapy adjustments and demonstrates progress.
Pain severity numeric rating scales provide simple monitoring tools. Track scores at each visit to identify response patterns.
Functional outcome measures assess disability and quality of life. The Patient-Reported Outcomes Measurement Information System tools offer efficient assessment.
| Outcome Domain |
Assessment Tool |
Administration Frequency |
Interpretation |
| Pain Severity |
0-10 Numeric Rating Scale |
Each visit |
2-point reduction clinically meaningful |
| Physical Function |
PROMIS Physical Function |
Monthly to quarterly |
T-score change of 5 points significant |
| Pain Interference |
Brief Pain Inventory |
Quarterly |
Assesses impact on daily activities |
| Depression Symptoms |
PHQ-9 |
Each visit or monthly |
Monitor for mood deterioration |
| Overall Improvement |
Patient Global Impression of Change |
Each follow-up visit |
Patient perception of benefit |
Addressing Treatment Barriers
Multiple obstacles impede effective nociplastic pain management in real-world settings. Identifying and addressing these barriers improves outcomes.
Insurance coverage limitations affect access to interdisciplinary treatments. Prior authorization requirements delay beneficial therapies like physical therapy and psychology.
Patient expectations for quick fixes conflict with gradual improvement timelines. Education about realistic treatment courses reduces frustration and dropout.
- Insurance prior authorization delays for medications and specialized services
- Limited access to pain psychologists and interdisciplinary programs
- Patient preference for passive treatments over active self-management
- Medication cost barriers affecting adherence to effective agents
- Time constraints in primary care limiting comprehensive assessment
- Lack of provider training in nociplastic pain recognition
- Patient resistance to diagnoses without clear structural pathology
- Stigma associated with chronic pain and mental health conditions
Nociplastic Pain in Special Populations and Comorbidities
Certain patient populations present unique challenges for nociplastic pain assessment and management. Tailored approaches account for developmental, demographic, and comorbidity factors.
Age-related differences affect pain presentation and treatment tolerability. Geriatric and pediatric patients require modified diagnostic and therapeutic strategies.
Pediatric Nociplastic Pain Considerations
Children and adolescents develop nociplastic pain conditions less frequently than adults. However, chronic widespread pain occurs in approximately 2-6% of youth.
Juvenile fibromyalgia presents similarly to adult disease but requires developmental considerations. School absence and social withdrawal represent important functional impacts.
Parental responses to child pain significantly influence outcomes. Excessive protective behaviors may inadvertently reinforce pain behaviors and disability.
Treatment emphasizes maintaining normal activities including school attendance and peer interactions. Family-based approaches address household dynamics affecting the pain experience.
- Screen for adverse childhood experiences contributing to central sensitization
- Assess school attendance and academic performance as functional outcomes
- Involve parents in treatment planning while promoting age-appropriate independence
- Use developmentally appropriate pain assessment tools and language
- Emphasize physical activity and sports participation when tolerated
- Address sleep hygiene and screen time affecting rest quality
- Coordinate care with school nurses and counselors
- Monitor medication side effects particularly affecting growth and development
Geriatric Nociplastic Pain Management
Older adults present diagnostic challenges due to multiple comorbidities and medications. Distinguishing nociplastic pain from nociceptive causes requires careful evaluation.
Polypharmacy increases risks of drug interactions and adverse effects. Medication selection must consider altered pharmacokinetics in aging populations.
Comorbid conditions like osteoarthritis and spinal stenosis may coexist with nociplastic mechanisms. Mixed pain states require multimodal treatment approaches.
Fall risk increases with certain medications used for nociplastic pain. Tricyclic antidepressants and gabapentinoids require cautious dosing in elderly patients.
Geriatric Assessment Considerations
- Evaluate cognitive function affecting self-report reliability
- Screen for depression common in elderly chronic pain
- Assess functional status and independence in daily activities
- Review complete medication lists for interactions
- Consider reduced drug clearance in renal insufficiency
- Evaluate fall risk from medications and pain
- Address social support and caregiver involvement
Treatment Modifications for Elderly
- Start medications at lower doses with gradual titration
- Monitor closely for sedation and cognitive effects
- Emphasize fall prevention in therapy programs
- Modify exercise intensity for physical limitations
- Consider transportation barriers to appointments
- Simplify medication regimens for better adherence
- Involve family members in education and planning
Comorbid Mental Health Conditions
Depression and anxiety disorders occur at elevated rates in patients chronic pain. The relationship between mood disorders and nociplastic pain appears bidirectional.
Depression amplifies pain perception through altered neurotransmitter function. Simultaneously, chronic pain increases depression risk through multiple mechanisms.
Treating comorbid depression often improves pain outcomes. Antidepressant medications may benefit both conditions simultaneously.
Post-traumatic stress disorder associates with increased chronic pain prevalence. Trauma history should be sensitively assessed in comprehensive evaluations.
Pregnancy and Postpartum Considerations
Pregnancy presents unique challenges for managing preexisting nociplastic pain conditions. Medication safety concerns limit pharmacological options.
Some women experience fibromyalgia symptom improvement during pregnancy. However, postpartum periods often involve symptom exacerbations.
Non-pharmacological treatments become primary approaches during pregnancy. Physical therapy, cognitive behavioral therapy, and exercise remain safe options.
- Review medication safety profiles before conception when possible
- Discontinue higher-risk medications when pregnancy confirmed
- Emphasize non-pharmacological pain management strategies
- Monitor for postpartum depression affecting pain and function
- Provide extra support during postpartum period of high symptom risk
- Address sleep deprivation from infant care worsening pain
- Coordinate care between obstetricians and pain specialists
Athletes and Physically Active Individuals
Athletic populations may develop nociplastic pain following repetitive injuries or overtraining. Tissue healing occurs but pain persists beyond expected timelines.
Return-to-sport decisions require balancing pain persistence with tissue safety. Pain alone should not dictate activity restriction when healing complete.
Athletes often have difficulty accepting chronic pain diagnoses. Identity challenges arise when unable to perform at previous levels.
Psychological support helps athletes adjust expectations and redefine success. Cognitive behavioral therapy addresses perfectionism and performance pressure.
Occupational Factors and Work-Related Pain
Workplace factors influence nociplastic pain development and maintenance. Job demands, stress levels, and workplace support affect outcomes.
Workers’ compensation cases involve additional complexity in assessment and treatment. Litigation and disability evaluations may impact symptom reporting.
Return-to-work planning requires functional capacity evaluation and workplace accommodation. Graduated return schedules facilitate successful reintegration.
Vocational counseling may benefit patients unable to return to previous positions. Identifying transferable skills and alternative careers reduces disability.
Healthcare System and Policy Implications of Nociplastic Pain
Nociplastic pain recognition affects healthcare delivery, resource allocation, and policy decisions. Systems-level changes improve care quality and efficiency.
The burden of chronic pain on healthcare systems worldwide remains substantial. Understanding nociplastic mechanisms influences treatment guidelines and reimbursement policies.
Economic Impact of Nociplastic Pain Conditions
Chronic pain conditions including fibromyalgia generate enormous healthcare costs. Direct medical expenses and indirect costs from lost productivity create substantial economic burden.
Fibromyalgia alone costs the United States healthcare system billions annually. Emergency department visits, imaging studies, and ineffective treatments contribute to expenses.
Early accurate diagnosis reduces unnecessary testing and specialist referrals. Recognition of nociplastic mechanisms directs resources toward effective interventions.
| Cost Category |
Components |
Estimated Impact |
Reduction Strategies |
| Direct Medical Costs |
Physician visits, medications, testing |
Billions annually in US alone |
Early diagnosis, appropriate treatment |
| Indirect Costs |
Work disability, lost productivity |
Exceeds direct medical expenses |
Functional restoration programs |
| Emergency Care |
ED visits for pain exacerbations |
High per-visit costs, frequent use |
Crisis management plans, access |
| Unnecessary Testing |
Repeated imaging, lab work |
Substantial diagnostic costs |
Education, diagnostic guidelines |
Clinical Practice Guidelines Development
Professional medical societies develop evidence-based guidelines for nociplastic pain management. These recommendations standardize care and improve quality.
The American College of Rheumatology published fibromyalgia management guidelines. Recommendations emphasize non-pharmacological approaches as first-line treatments.
The International Association for the Study of Pain promotes consistent terminology. Standardized classification systems facilitate research and clinical communication.
Guideline implementation requires provider education and system support. Clinical decision support tools embedded in electronic records aid adherence.
Insurance Coverage and Reimbursement Issues
Insurance policies significantly impact access to effective nociplastic pain treatments. Coverage limitations for interdisciplinary programs create barriers to comprehensive care.
Physical therapy visit limits prevent adequate rehabilitation for chronic conditions. Mental health coverage gaps restrict access to cognitive behavioral therapy.
Prior authorization requirements delay medication initiation. Burdensome administrative processes frustrate providers and patients alike.
- Advocate for adequate physical therapy benefits without arbitrary visit caps
- Support mental health parity ensuring psychology access for pain patients
- Develop streamlined prior authorization for evidence-based medications
- Create reimbursement codes for interdisciplinary pain management services
- Establish quality metrics for chronic pain care promoting best practices
- Educate insurers about cost-effectiveness of comprehensive early intervention
- Support legislation protecting patient access to multimodal treatment
Provider Education and Training Needs
Medical education often provides limited chronic pain training. Curricula improvements at medical schools and residency programs enhance future provider skills.
Continuing medical education programs update practicing clinicians. Focused courses on nociplastic pain assessment and management fill knowledge gaps.
Specialty certification in pain medicine requires comprehensive training. Fellowship programs provide intensive education in complex pain management.
Quality Improvement Initiatives
Healthcare systems implement quality improvement projects targeting chronic pain care. Standardized assessment protocols improve identification rates and treatment consistency.
Registry programs track outcomes for chronic pain populations. Data analysis identifies successful interventions and areas needing improvement.
Patient-reported outcome measures integration provides valuable information. Systematic collection of pain, function, and quality of life data guides clinical decisions.
Learning collaboratives bring together multiple healthcare organizations. Shared best practices and peer support accelerate improvement efforts.
Research Funding and Priorities
National Institutes of Health funding supports chronic pain research advancement. The HEAL Initiative dedicates substantial resources to pain mechanism studies and treatment development.
Research priorities include biomarker discovery enabling objective diagnosis. Genetic studies explore hereditary factors influencing pain susceptibility.
Comparative effectiveness research evaluates different treatment approaches. Real-world evidence complements controlled trial data informing clinical practice.
Implementation science studies address gaps between evidence and practice. Research examines strategies for translating effective interventions into routine care.
Patient Perspectives and the Lived Experience of Nociplastic Pain
Understanding patient experiences provides crucial context beyond clinical criteria. The lived reality of nociplastic pain conditions profoundly impacts multiple life domains.
Validation represents a fundamental need for patients with nociplastic pain. Medical dismissal due to normal test results creates psychological distress and delays proper treatment.
Diagnostic Journey Challenges
Patients often endure years of uncertainty before receiving accurate diagnoses. Multiple provider visits and tests precede nociplastic pain recognition in many cases.
Medical gaslighting occurs when providers dismiss patient complaints without clear pathology. This invalidation damages therapeutic relationships and increases suffering.
Relief often accompanies diagnosis despite persistent symptoms. Having an explanation for pain validates the experience and enables targeted treatment.
“For years, doctors told me nothing was wrong because my tests were normal. I started doubting myself, wondering if the pain was all in my head. Finally getting a fibromyalgia diagnosis was a relief – validation that my pain was real, not imagined.”
Patient testimonial about diagnostic experience
Impact on Daily Functioning and Quality of Life
Chronic widespread pain significantly impairs work capacity and productivity. Many patients reduce work hours or apply for disability benefits.
Social relationships suffer when pain limits participation in activities. Friends and family members may not understand invisible chronic illness.
Recreational activities and hobbies become difficult or impossible. Loss of enjoyable pursuits contributes to depression and reduced life satisfaction.
- Work absences and reduced productivity affecting career advancement
- Financial strain from medical costs and lost income
- Social isolation from inability to maintain relationships and activities
- Family stress from role changes and caregiver burden
- Loss of identity and self-worth tied to previous capabilities
- Difficulty maintaining household responsibilities and self-care
- Sleep disruption perpetuating fatigue and reducing coping capacity
- Cognitive difficulties affecting memory, concentration, and decision-making
Stigma and Misunderstanding
Stigma surrounding chronic pain without visible cause creates additional burden. Others may view symptoms as exaggerated or psychosomatic.
The “but you don’t look sick” comment dismisses real suffering. Invisible disabilities face skepticism in medical, social, and workplace contexts.
Mental health stigma compounds pain stigma when conditions coexist. Patients fear being labeled as “difficult” or having psychological problems.
Social media support groups provide valuable peer validation. Online communities offer understanding from others with similar experiences.
Coping Strategies and Resilience
Successful adaptation involves developing effective coping strategies over time. Patients learn through trial and error what approaches work individually.
Pacing activities prevents symptom exacerbations from overexertion. Balancing activity and rest becomes a refined skill through practice.
Mindfulness and acceptance reduce suffering even when pain persists. Psychological flexibility enables valued living despite chronic symptoms.
Peer support provides emotional sustenance and practical advice. Connecting with others who understand reduces isolation and hopelessness.
Helpful Coping Approaches
- Activity pacing and energy conservation
- Mindfulness meditation and relaxation
- Regular gentle exercise within tolerance
- Sleep hygiene and rest prioritization
- Social connection maintenance
- Meaningful activity engagement
- Self-compassion and acceptance
- Advocacy and education of others
Maladaptive Responses to Avoid
- Complete activity avoidance from fear
- Overactivity on good days causing flares
- Social withdrawal and isolation
- Excessive research and health anxiety
- Doctor shopping seeking cures
- Catastrophic thinking patterns
- Substance use for pain relief
- Neglecting other health needs
Patient Advocacy and Empowerment
Patient advocacy organizations raise awareness and support research. Groups like the National Fibromyalgia Association provide education and resources.
Self-advocacy skills help patients navigate healthcare systems effectively. Learning to communicate needs and preferences improves care quality.
Peer mentorship programs connect newly diagnosed individuals with experienced patients. Mentors offer practical advice and emotional support during adjustment.
Participation in research studies allows patients to contribute to medical progress. Many find meaning in helping advance understanding of their conditions.
Frequently Asked Questions About Nociplastic Pain Clinical Criteria
What makes nociplastic pain different from other types of chronic pain?
Nociplastic pain arises from altered processing in the central nervous system rather than tissue damage or nerve injury. The pain experience is real but results from amplified pain signals without proportional pathology. This differs from nociceptive pain caused by actual tissue damage or neuropathic pain from nerve damage.
Patients with nociplastic pain typically show widespread distribution, multiple sensory sensitivities, and poor response to traditional analgesics. The central nervous system demonstrates heightened reactivity to normally non-painful stimuli.
Can nociplastic pain be diagnosed with a blood test or imaging?
No single test diagnoses nociplastic pain currently. Diagnosis relies on clinical criteria including patient history, symptom patterns, physical examination findings, and validated questionnaires. Laboratory tests and imaging primarily serve to exclude other conditions.
Research explores potential biomarkers using advanced techniques like functional brain imaging. However, these remain investigational tools not yet applicable in routine clinical practice. Diagnosis depends on comprehensive clinical assessment by knowledgeable providers.
How long does it typically take to diagnose nociplastic pain?
Diagnostic timelines vary considerably among patients. Many individuals see multiple providers over several years before receiving accurate diagnosis. Average time from symptom onset to diagnosis may exceed five years in some conditions like fibromyalgia.
Delays occur due to limited provider awareness, normal test results causing confusion, and the need to exclude other conditions. Increasing recognition of nociplastic pain concepts should reduce these delays through earlier identification.
Will nociplastic pain ever completely go away?
Nociplastic pain conditions typically follow a chronic course with symptom fluctuations. Complete permanent resolution occurs less commonly than with acute nociceptive pain from injury. However, significant improvement and management of symptoms remain achievable goals.
Treatment focuses on reducing pain severity, improving function, and enhancing quality of life rather than cure. Many patients achieve satisfactory symptom control through multimodal approaches. Realistic expectations about improvement timelines and outcomes support better adjustment.
What treatments work best for nociplastic pain?
Comprehensive multimodal approaches combining multiple interventions show the best outcomes. Medications targeting central nervous system neurotransmitters like SNRIs, tricyclic antidepressants, and gabapentinoids demonstrate efficacy. Non-pharmacological treatments including exercise, cognitive behavioral therapy, and patient education prove equally important.
Treatment must be individualized based on symptom patterns, comorbidities, and patient preferences. No single intervention works for everyone. Combination approaches addressing multiple domains yield better results than medication alone.
Should I avoid physical activity if I have nociplastic pain?
No, physical activity represents a cornerstone of nociplastic pain management. Regular exercise improves pain, function, and quality of life in multiple studies. The key involves gradual progression starting at tolerable levels.
Pacing prevents overexertion causing symptom flares. Low-impact activities like walking, swimming, or cycling work well for most patients. Exercise benefits include improved central pain modulation, better sleep, enhanced mood, and increased functional capacity. Guidance from physical therapists helps optimize exercise programs.
Can nociplastic pain develop after an injury or surgery?
Yes, nociplastic pain may develop following tissue injury or surgical procedures. Initial nociceptive pain from tissue damage can evolve into persistent nociplastic pain after healing. This transition occurs through central sensitization mechanisms triggered by the initial painful stimulus.
Risk factors for chronification include severe acute pain, psychosocial stress, and genetic predisposition. Adequate pain control during initial injury periods may reduce chronic pain risk. Recognition of evolving nociplastic mechanisms allows appropriate treatment adjustments.
Is nociplastic pain related to autoimmune diseases?
Nociplastic pain itself is not an autoimmune condition. However, individuals with autoimmune diseases like rheumatoid arthritis may develop secondary nociplastic pain mechanisms. Research explores potential immune system contributions to central sensitization.
Distinguishing nociplastic pain from disease activity in autoimmune conditions proves important for treatment. Inflammatory markers and joint examination help differentiate these mechanisms. Some patients have both active inflammation and central sensitization requiring different therapeutic approaches.
Are there genetic factors that increase nociplastic pain risk?
Research indicates moderate genetic influence on nociplastic pain susceptibility. Twin studies suggest hereditary factors contribute approximately 50% to fibromyalgia risk. Multiple genes affecting neurotransmitter systems, pain sensitivity, and stress responses show associations.
No single gene determines nociplastic pain development. Rather, multiple genetic variants combine with environmental factors influencing overall risk. Family history of chronic pain conditions may indicate increased susceptibility. However, genetics do not represent destiny – environmental and lifestyle factors significantly affect outcomes.
How do I find a healthcare provider knowledgeable about nociplastic pain?
Start by asking your primary care provider about referral to pain specialists or rheumatologists. Academic medical centers often have specialized chronic pain programs with multidisciplinary expertise. Professional organizations like the American Academy of Pain Medicine maintain provider directories.
When selecting providers, ask about experience treating fibromyalgia and chronic widespread pain. Inquire whether they use multimodal approaches including non-pharmacological treatments. Patient advocacy organizations sometimes provide lists of recommended clinicians. Telemedicine expands access to specialists in underserved areas.
Need Expert Guidance for Complex Nociplastic Pain Cases?
Our specialized pain management team provides professional consultation services for challenging diagnostic scenarios and treatment-resistant cases. Schedule a consultation to discuss complex patient presentations, optimize treatment strategies, and access evidence-based protocols tailored to your clinical practice needs.
For immediate clinical questions:
1-800-555-1234Available Monday-Friday, 8 AM – 6 PM EST
Conclusion: Advancing Nociplastic Pain Recognition and Management
Nociplastic pain clinical criteria provide healthcare professionals with structured frameworks for identifying altered central pain processing. Recognition of this distinct pain mechanism transforms diagnostic accuracy and treatment selection.
The International Association for the Study of Pain classification system brings clarity to previously confusing chronic pain presentations. Standardized terminology facilitates communication among providers and promotes research advancement.
Comprehensive assessment integrating history, examination, and validated questionnaires improves identification rates. Systematic approaches overcome challenges of busy clinical environments through efficient screening methods.
Multimodal treatment combining pharmacological, non-pharmacological, and self-management strategies optimizes outcomes. Evidence supports this comprehensive approach over single-modality interventions.
Patient education about pain mechanisms reduces catastrophizing and improves engagement in active treatment. Understanding that pain does not equal tissue damage empowers patients to participate in rehabilitation.
Ongoing research continues revealing new insights into nociplastic pain mechanisms. Future advances promise improved diagnostic biomarkers, novel therapeutic targets, and personalized medicine approaches.
Healthcare system changes supporting interdisciplinary care improve accessibility to evidence-based treatment. Policy advocacy promotes insurance coverage for effective multimodal interventions.
Recognition and appropriate management of nociplastic pain ultimately enhances quality of life for millions. Implementation of clinical criteria in practice settings represents an important step toward better care.
The evolution from dismissing unexplained pain to recognizing central sensitization mechanisms marks significant medical progress. Continued education of healthcare professionals ensures widespread adoption of these evidence-based concepts.
Stay Updated on Nociplastic Pain Research and Clinical Advances
Subscribe to our professional newsletter delivering monthly summaries of latest research, clinical practice updates, and expert commentary on nociplastic pain management. Join thousands of healthcare providers staying current with evidence-based pain medicine developments.