Knee replacement infection signs
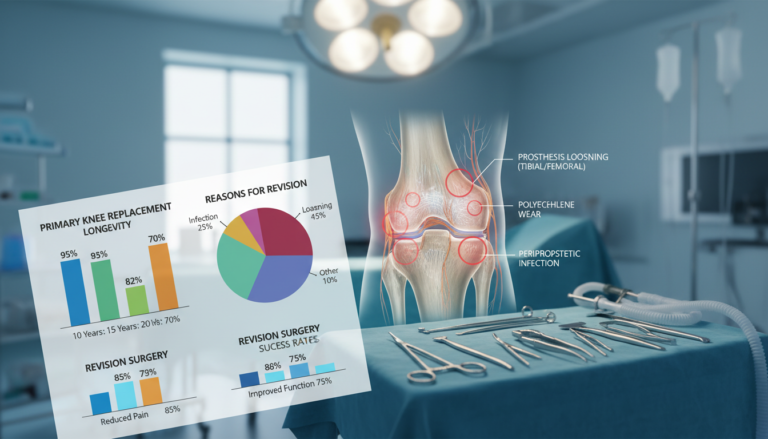
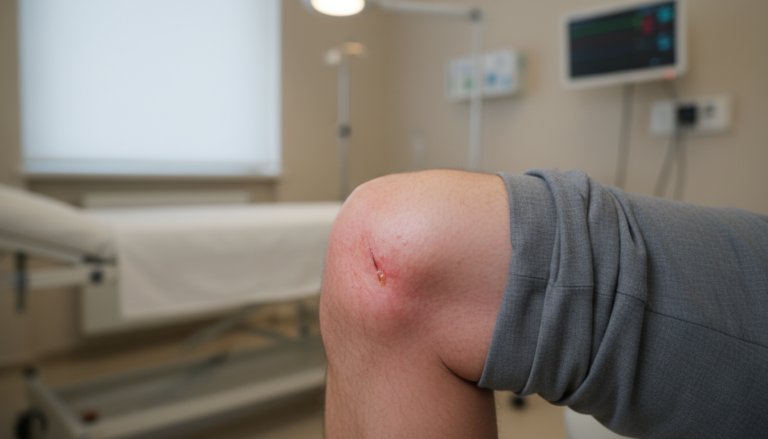
What if the biggest threat to your new joint isn’t the surgery itself, but something that can surface weeks or even years later? Being aware of Knee replacement infection signs is crucial. Total hip and knee arthroplasties are among the most common elective operations. For most people, they are a resounding success. Yet, data shows about 1 in 100 patients will face a serious complication after their procedure. monitoring knee replacement healing We recognize that a successful outcome relies on two things: the surgical skill and your long-term vigilance. Our goal is to empower you with knowledge. By learning to monitor your recovery, you can protect your investment in a pain-free life. This guide helps you distinguish between normal healing and the early warning signals of a problem. Understanding these signs allows you to seek timely medical attention for a joint replacement. Understanding the Knee replacement infection signs can make a significant difference in your recovery journey. Key Takeaways While highly successful, about 1% of joint replacement patients develop an infection. Early detection of complications is critical for protecting your surgical results. Patient awareness during the recovery process is as important as the initial procedure. Knowing the difference between normal healing and potential warning signs is key. Common indicators include increased pain, new swelling, warmth, redness, or fever. Prompt action and communication with your healthcare team are essential. Long-term joint health requires ongoing attention and care. Overview of Knee Replacement Surgery and Infection Risks With millions of Americans opting for this surgery each year, understanding its scope and associated risks is fundamental. This procedure is a cornerstone of modern orthopedics, offering renewed mobility to those with severe joint conditions. knee replacement surgery overview Introduction to Knee Replacement Procedures Medical projections suggest that by 2030, the number of these operations performed annually in the United States will reach 3.48 million. This type of intervention is highly common and successful. It involves replacing damaged joint surfaces with artificial components. Why Infections Occur Around Implants Bacteria are abundant on our skin and in our bodies. They can enter during surgery or later through the bloodstream. Once they reach the artificial joint, they can form a sticky biofilm. This biofilm makes it extremely difficult for the body’s natural defenses to clear the germs. Implants are made of metal and plastic, which are non-organic materials. The immune system struggles to fight bacteria that colonize these surfaces. Such complications can occur in the surgical wound or deep around the implant itself. Understanding these underlying conditions is the first step in prevention. Knee Replacement Infection Signs: What to Watch For Your vigilance in the weeks and months following the procedure is your first line of defense against potential problems. We empower you to become an expert in your own recovery. Knowing what to expect makes it easier to spot when something is wrong. Common Symptoms and Warning Signals Certain symptoms should prompt immediate contact with your care team. A fever above 100°F (37.8°C) is a classic red flag. Chills or night sweats often accompany it. Pay close attention to the surgical wound. Any foul-smelling or grey liquid drainage is not normal. Increased pain or stiffness that doesn’t improve after several weeks is a concern. A deep joint infection might make walking painful long after your expected recovery period. We remind you that these issues can surface months or years later. knee replacement infection…